Incubating chicken eggs is a fun, rewarding, and economical way to raise your birds for various reasons.
You might be incubating eggs for various reasons, including starting or growing your flock, producing a steady stream of birds for meat, or raising chicks to sell to other poultry farmers and homesteaders.
Whatever your reason for hatching eggs, it is important to understand when to stop turning chicken eggs to maximize your hatch rate.
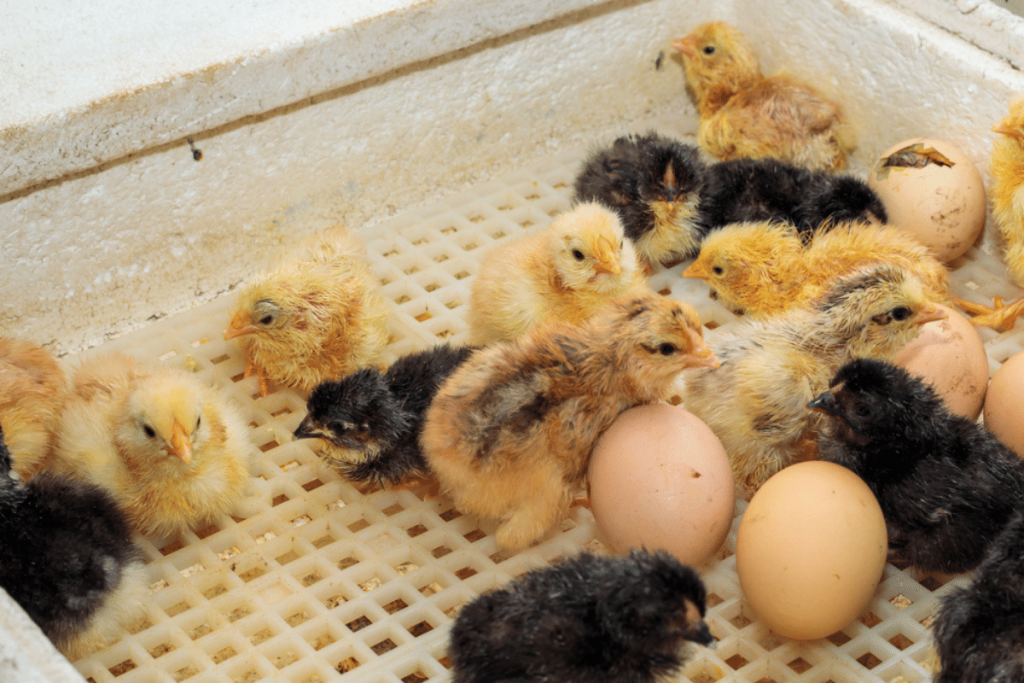
Chicken eggs should stop being turned after 18 days of being placed in the incubator or 3 days before hatching from the total 21 days in the incubator. Days 17-19 are all fine days to stop turning and not disrupt the final development of the embryo and for best and most consistent results, stop turning on day 18.
However, some faster-growing breeds will hatch a few days faster.
Bantam chickens, for example, will hatch after being incubated for only 18 or 19 days and should stop being turned after 16 days.
Keep reading to learn more about turning your chicken eggs to make the most of this rewarding experience!
Why Do I Need To Turn Chicken Eggs While Incubating Them?
Turning chicken eggs while incubating is a crucial step for embryo development inside the egg.
If you were to observe a brooding hen, you would see her constantly turning the eggs.
While incubating, it is best to recreate the natural environment thousands of years of evolution have perfected.
Read more about how long chickens sit on eggs and what they do naturally in our article here.
The reason chicken eggs need to be turned while they are being incubated is quite simple:
The yolk, the home of the developing embryo, tends to want to float up in the albumen, commonly referred to as the egg white. As the yolk and developing embryo float to the top of the egg, the embryo risks getting stuck to the egg shell and causing deformities, damage, and embryo deaths to the developing chicks.
Another reason it is important to turn chicken eggs is to allow the embryo’s internal nutrients and waste products to spread more evenly.
Turning eggs is important throughout the first 16 days of incubation and especially during the first 7 days of the 21-day incubation period.
The first 7 days are a critical time for the bird eggs to avoid issues with embryo development and set up the clutch in a good position for hatching well.
How Often Should You Turn Chicken Eggs While Incubating Them?
To support the best development conditions for your eggs, turning them a minimum of three times a day is required, with five times being even better.
Some owners use the time frame of 5-7 hours per turn, but if you stick to 3-5 times per day, you’ll be doing enough too.
When turning your eggs, turn them about 80° degrees at a time, taking care to rotate them in the same direction.
One tip to better keep track when turning the eggs is to place a line on each egg with a sharpie to have a visual marker.
If you are turning your eggs by hand, wash your hands before touching the eggs to prevent possible diseases.
If you are looking for an egg incubator to cut down on the labor of turning eggs, this 22-egg capacity incubator has automatic turners and will turn them for you.
It even offers a clear dome top to watch through as the chicks hatch.
What Temperature And Humidity Should The Incubator Be Kept At?
The incubator temperature should be kept consistently between 100-102° degrees Fahrenheit (38.8° C).
The proper humidity levels should begin at 30-50% while the eggs are being turned, and once you stop turning the eggs, they should be bumped up to 65-75% for those last few days of the incubation process.
Humidity and temperature are both important factors for the development of the chick.
Proper temperature and constant temperature are important to prevent any deformities from arising while the embryo develops.
It also prevents the egg from hatching prematurely in high temperatures or not developing in low temperatures.
A humid incubator is important because as the chick grows, the moisture inside the eggs must evaporate to give more space.
With humidity in the 30-50% range, the egg will evaporate its internal liquid at an ideal rate, while low humidity will cause the eggs to evaporate too quickly.
At higher humidity, the egg wouldn’t be able to lose enough liquid for the chick.
After 18 days and when you stop turning the eggs, raising the humidity allows the baby chicks to hatch easier and separate themselves from the egg shell without getting stuck.
After a successful hatch, be sure to have your chick starter feed.
How Can I Tell If My Chicken Eggs Have Been Fertilized?
You’d be surprised how many people assume you need a rooster to have eggs at all!
This isn’t true, and not all eggs are fertilized.
The easiest, more surefire way of telling if a chicken egg has been fertilized and is successfully developing is through a process known as candling.
Candling is the process of shining a light through the egg shell and can show the development and signs of life going on inside the egg.
As the name suggests, candling used to be done using candles before the invention of flashlights.
Now, it is easiest to use a bright LED flashlight or even the bright light on your cell phone to shine through the egg.
Below are the steps to candle an egg and check the progress as the chick embryo develops.
- In a dark room and with clean hands, place the sanitized flashlight over the large part of the egg.
- Take care not to keep the eggs out of the incubator for longer than necessary.
- After 4 days, observe veins and blood vessels working their way throughout the egg and a large red dot beginning to form. This is the embryo; take special note as this grows over time.
- Another thing to notice is the air bubble growing over time, which will leave more room for the embryo to grow inside the egg.
- Do not candle the eggs frequently as you risk slowing or damaging the development or spreading bacteria. Every 3-5 days is plenty.
Before placing the eggs in the incubator, candle them as well to check for any cracks in the shell or other deformities in the eggs.
If the egg is cracked or you notice anything else wrong with it, it will likely not hatch and is not worth incubating.
Further reading: Abnormal eggs and when to worry.
